Agricultural and Biological Research
RNI # 24/103/2012-R1
Review Article - (2025) Volume 41, Issue 2
Soil sampling is a fundamental practice in soil science, essential for assessing soil fertility, nutrient availability, and overall soil health. This paper provides an in-depth overview of soil sampling techniques, their significance, and the processes involved in sample collection and laboratory preparation. It highlights the role of soil in supporting plant growth by providing essential nutrients and water, as well as its critical functions in ecosystems.
Understanding the methods of soil sampling is key for accurate soil testing, which in turn aids in efficient soil management, crop nutrition, and environmental sustainability. The paper discusses various types of soil sampling, including pedological sampling, which focuses on soil formation and profile analysis, and fertility assessment sampling, which examines the nutrient status within the root zone. Different approaches to sampling are outlined, such as shallow surface sampling, deep subsurface sampling, and stratified sampling, all of which are tailored to specific soil characteristics and management needs. A key focus is placed on the importance of selecting representative sample areas within a field to avoid errors caused by non-homogeneous soil conditions, such as varying soil types, management practices, and crop growth patterns.
The manuscript further explains the procedures involved in collecting and preparing soil samples, emphasizing the need for proper tools, techniques, and sample handling to ensure accurate laboratory results. The preparation process includes drying, grinding, sieving, and storing samples, with careful attention to maintaining sample integrity. Special attention is also given to the sampling of salt-affected soils, highlighting unique challenges and methods for evaluating gypsum requirements and soil reclamation.
Soil testing, followed by precise analysis, enables accurate fertilizer recommendations, helping farmers optimize nutrient use, reduce costs, and minimize environmental impacts. This paper underscores the necessity of consistent, accurate soil sampling as part of a sustainable agricultural practice that supports crop productivity and environmental stewardship.
Soil sampling; Soil fertility; Nutrient availability; Soil testing; Sampling methods; Soil preparation; Environmental sustainability; Agricultural practices
Soil sampling
Objectives
Soil is a mixture of organic matter, minerals, gases, liquids, micro and macro organisms that together support life. Soils are primary source of water and nutrients to the plants. Soil provides more than 16 essential plant nutrients for the plant [1]. These are Carbon (C), Hydrogen (H), Oxygen (O), Nitrogen (N), Phosphorus (P), Potassium (K), Calcium (Ca), Magnesium (Mg), Iron (Fe), Sulphur (S), Zinc (Zn), Manganese (Mn), Copper (Cu), Boron (B), Molybdenum (Mo) and Chlorine (Cl). These nutrient elements have to be available to the crops in quantities as required for a yield target. Any limiting or deficient nutrient (or nutrients) will limit crop growth. In any ecosystem, whether your backyard, a farm, a forest or regional water shed, soils have five-key roles to play [2].
These are:
Why soil testing?
Definitions
Soil sampling is the process of obtaining small amount of soil from sampling point to represent the total sampling area. Soil testing is a chemical method for estimation of nutrient supplying power of soil (soil fertility evaluation). Soil fertility is the inherent capacity of the soil to supply nutrients to plants in adequate amounts and in suitable proportions. Soil productivity is the capacity of the soil to produce crops with specific systems of management and is expressed in terms of yields [3].
Generally, procedures for soil testing follow the following phases:
Types of soil sampling
The methods and procedures for obtaining soil samples vary according to the purpose of the sampling. Analysis of soil samples may be needed for engineering and agricultural purposes. Based on the purpose of soil sampling, methods of soil sampling can be:
Pedological purpose soil sampling: Pedological soil sampling conducted to study soil formation and soil development (soil profile and soil horizon). The procedures of pedological purpose sampling are:
Soil fertility assessment soil sampling: It is important to study the presence of organic, inorganic and other soil nutrients around the root zone (up 20 cm) of soil. Soil sampling for soil fertility assessment purpose conducted either shallow or deep subsurface soil sampling.
Shallow surface soil sampling: The soil surface excavated up to 30 cm deep. These types of soil sampling conducted if there is full information about soil type and management history from the previous soil sampling [4].
Deep subsurface soil sampling: Deep subsurface soil samplings allow us how deep the concentration of salt minerals within the soil in comparison with other soil nutrients. The soil sample taken up to 100 cm depth based on concentration of salt in the soil.
Sampling guideline
It provides information or clue about when, where, and how deep to sample and how many samples to take within the specific sampling area [5].
General guidelines on selecting sampling sites: For a general assessment of soil quality, select sample sites within a field that are representative of the field. Refer to soil maps of the area (Soil survey) to identify soil type differences and variations within the map unit (Figure 1).
Figure 1) Soil maps with different soil types
For assessment of trouble spots within a field, sample areas that are representative of the trouble spots (Figure 2).
Figure 2) Trouble spot
When comparing management systems, make sure sites selected for comparison have the same soil type and located on the same topographical features in both fields. For example, if sites are measured in the wheel tracks in one field, wheel tracks sites should be selected in the comparison field.
When monitoring changes in soil quality over time, make sure the same sites within the field are measured at each sampling time. Also, try to take measurements at the same soil moisture conditions at each sampling time to reduce variability. In some cases, it might be helpful to compare sampling points if the field is sampled at different points across gradients of soil type, soil moisture, slope, or other factors rather than just at a fixed point [6].
Time of soil sampling: The preferred time to sample is fall. Soil sample can be collected from agricultural fields after harvest and before planting the subsequent crop. Generally, the following occasions are essential to take soil sample:
Where to sample
An important consideration in determining where to sample in a field is the variability of the area. Fields with significant landscape or other differences should be divided into separate sample areas. Differences may include soil types and texture, slope, degree of erosion, drainage, cropping, manure history and erosion, or other factors that may influence soil nutrient levels. Then, soil sample should be taken from each separated similar area [7].
Field characteristics to be considered in soil sampling are:
Amount of soil sample
The number of samples or measurements to take will depend on the variability of the field. It is recommended that a minimum of three samples or measurements be collected on any one soil type and management combination. Individual soil cores from a minimum of 20 locations (from total sampling area) should be mixed thoroughly in a clean plastic container. In general, the greater the variability of the field, more measurements are needed to get a representative value at the field scale. When measuring EC, pH, soil phosphates and nitrates at the field scale, eight or nine sample cores from across the field could be bulked and mixed, and two subsamples from the mixed cores could be analyzed [8].
Error in soil sampling
Soil sampling error is statistical errors that occur when an analysis does not select a sample that represent the entire population of data. The result found in the sample thus does not represent the result that would be obtained from the entire population.
How error is occurred in soil sampling? Error is occurred in soil sampling, if sample is not representative of the field and incorrectly taken from soil sampled area.
Not representative of the field: Try to stay away from areas with potential sources of sample misrepresentation or sample them separately:
Incorrectly taken: When sampling points are randomly chosen without equal interval in the uniform field and also taking soil sample without fulfilling all the required material leads to error in soil sampling. Careful soil sampling and sample handling is essential for accurate fertility recommendations. Samples must accurately reflect the fertility of the soil so that analysis, interpretations, and recommendations correctly represent the nutrient status of the entire field. Accurate evaluation can result in more efficient fertilizer use, reduced costs, and reduced environmental degradation.
Methods of soil sample collection
Depending on the degree of variability within a field, three methods of soil sampling commonly employed to collect soil sample from soil sampled area.
Composite sample: A composite soil sample should represent a uniform field area. Each area should have a similar crop and fertility history. Soil characteristics (color, slope, texture, drainage) should be similar. The most common sample collection method is to take a random sample from the field, without any reference to topography or other field features. This method works well in fields that are uniform in soil type, production and management history (Figures 3 and 4).
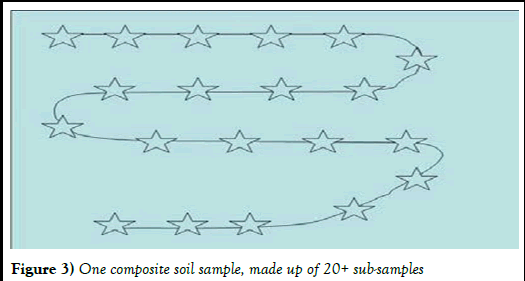
Figure 3) One composite soil sample, made up of 20+ sub-samples
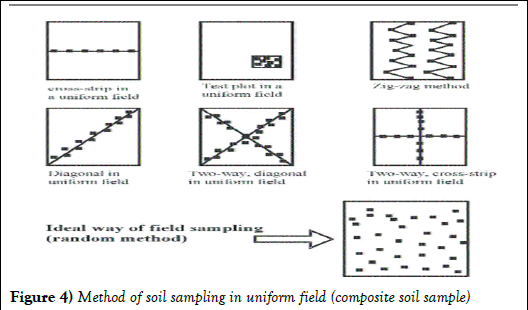
Figure 4) Method of soil sampling in uniform field (composite soil sample)
Stratified composite sample: A field may be broken down into areas of similar topography, management history and/or crop performance. Each area is then sampled separately (Figure 5).
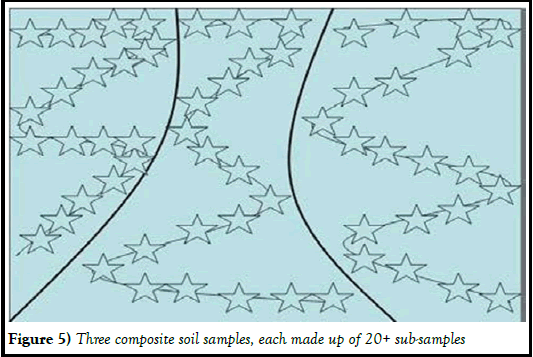
Figure 5) Three composite soil samples, each made up of 20+ sub-samples
Systematic or grid sampling: Sampling points are pre-determined across a field at fixed intervals such as one per hectare. Then four to five subsamples are taken near each point. Each point then has its own soil sample and result. With this information a fertility map may be created for the field showing areas of similar fertility. This may have benefit for high value crops or crops sensitive to certain nutrient levels and/or pH. If soils are high testing in nutrients, this method of sampling will likely have fewer benefits. This method is related to the use of GPS equipment (Figure 6).
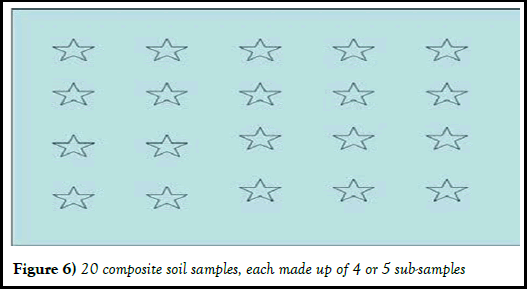
Figure 6) 20 composite soil samples, each made up of 4 or 5 sub-samples
Soil sampling tools and equipment
A stainless steel soil sampling auger (probe) is the most commonly used tool for collecting soil samples under normal conditions. The soil probe provides a continuous soil core with minimal disturbance to the soil that can be readily divided into various sampling depths.
Note that: Tools should be clean, free of rust, and stored away from fertilizer materials. Do not use galvanized or brass equipment of any kind as it will contaminate the soil samples.
Soil sampling procedures
Sampling procedure for shallow surface soil:
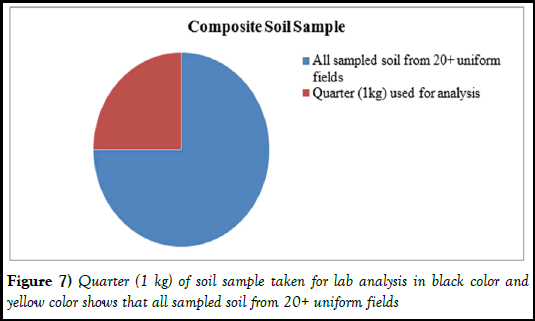
Figure 7) Quarter (1 kg) of soil sample taken for lab analysis in black color and yellow color shows that all sampled soil from 20+ uniform fields
Sampling salt-affected soils: Salt-affected soils may be sampled in two ways:
Soil sampling to determine the gypsum requirement of the soil: Surface samples (20-30 cm depth) should be taken in the same way as for soil fertility analysis. These samples are used to determine the gypsum requirement of the soil.
Soil sampling for reclamation purpose (Sub surface soil sampling): For reclamation purpose, it is necessary to know also the characteristics of lower soil depth. Therefore, such soils are sampled down to a depth of 1 m.
Soil sample preparation
Handling in the laboratory: As soon as the samples arrive at the soil testing laboratory, it should be checked against the accompanying information list.
Then adequate field notes should have been kept. All unidentifiable samples should be discarded. Information regarding samples should be recorded in a registered in registration book, and each sample should be given a laboratory number or code.
Drying of samples: Procedures to sample drying
Post-drying care: Procedures to post-drying care
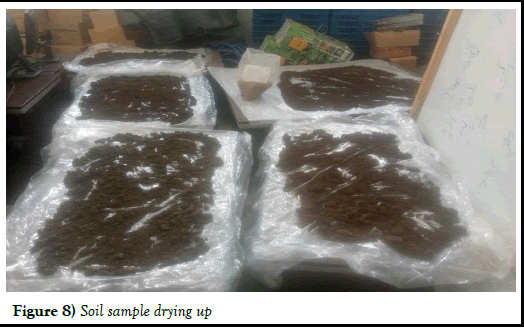
Figure 8) Soil sample drying up
Figure 9) Soil sample preparation
Soil sampling is a critical component of soil management and agricultural practices, providing essential data for evaluating soil fertility and nutrient availability. Accurate soil testing, which begins with representative and methodical soil sampling, is fundamental for optimizing crop productivity and ensuring sustainable land use. This paper underscores the importance of understanding different soil sampling techniques, including pedological and fertility assessment sampling, as well as specialized methods for saltaffected soils. Proper sampling enables reliable soil analysis, which in turn informs decision-making related to fertilizer application, soil amendments, and overall crop management.
One of the key factors in successful soil sampling is selecting appropriate sites within a field. Variability in soil properties, management history, and topography must be considered when choosing sample locations to ensure that the collected sample accurately reflects the conditions of the entire field. This is crucial for minimizing sampling errors and ensuring that the data obtained will lead to accurate soil fertility evaluations. Sampling procedures must be standardized and precise, with careful attention to the tools and techniques used to collect, handle, and prepare soil samples. As noted in the paper, maintaining sample integrity during collection, storage, and transport is essential for obtaining reliable results.
The laboratory preparation of soil samples—entailing drying, grinding, sieving, and proper storage is equally important for accurate nutrient analysis. Special consideration is needed when handling salt-affected soils, where deeper and more precise sampling is necessary for effective reclamation or gypsum requirement assessments.
Ultimately, soil sampling and subsequent testing are indispensable for informed soil management decisions. By ensuring that soil nutrient levels are accurately measured and analyzed, farmers can make more efficient and environmentally responsible fertilizer and irrigation choices. This contributes not only to improved crop yields but also to the long-term sustainability of agricultural systems. Soil sampling thus plays a vital role in enhancing agricultural productivity while protecting natural resources and promoting ecological balance.
Citation: Abate GG. Soil Sampling and Sample Preparation. AGBIR.2025;41(2): 1-5.
Received: 20-Nov-2023, Manuscript No. AGBIR-23-120557; , Pre QC No. AGBIR-23-120557 (PQ); Editor assigned: 22-Nov-2023, Pre QC No. AGBIR-23-120557 (PQ); Reviewed: 06-Dec-2023, QC No. AGBIR-23-120557; Revised: 21-Mar-2025, Manuscript No. AGBIR-23-120557 (R); Published: 28-Mar-2025, DOI: 10.37532/0970-1907.25.41.2.1-5
